Showing posts with label vegetable. Show all posts

Monday, January 24, 2011

Parsnip Soup (for a Soup Swap!)

Sunday was so much fun!! I was inspired by my sister's story on NPR and decided to host a soup swap here where nearly 100 quarts of soup were on hand to be shared and traded. In a nutshell, a soup swap is when everyone makes a big pot of soup, freezes it into one quart portions, then meets up to tell stories and take turns selecting different soups to bring home. Knowing our freezers would soon be filled with yummy homemade soups, we also pulled some canned good out of our pantries and collectively filled three boxes which are being donated to a local food pantry.
I spent some time thinking about what I would bring to the party, and ultimately decided to make parsnip soup because it is a favorite of mine and the kids, and I like telling the story of the first time I tried it.
The story: Five years ago Jim and I escaped (without toddler Spencer) to Vegas for a few days in December. We were having dinner at Wolfgang Puck's restaurant in the Venetian, and shortly after we were seated, the table next to us received their food which included a bowl of delicious-looking soup. My mind was decided in that instant I wanted a bowl of soup too. I scanned the menu for their different soups, and noticed there was exactly one listed: parsnip soup. Parsnip soup? I had never had parsnip soup before. Actually, I had never even eaten parsnips before. I went back and forth in my head for a bit - really wanting a bowl of soup, and being wholly unsure of parnsips. Ultimately, I decided that this was a great restaurant and I trusted that they would be serving me a great bowl of (parsnip!) soup.
Guess what - the soup totally rocked! After returning home, I wanted to make it myself and couldn't find the recipe online. Luckily, the nice folks at wolfgangpuck.com replied to my email and sent it to me.
So, my hope is that making this soup for the swap and sharing this story might help someone else discover the awesomeness of parsnip soup!

Parnsip Soup
from Wolfgang Puck's Postrio Restaurant

INGREDIENTS:
3 Tbsp olive oil
2 medium yellow onions, peeled and rough diced (or one large onion)
2 stalks celery, cut to 1” lengths
6 cups parsnips, peeled and cut to 1” cubes (will be rough)
1 ea potato, peeled and cut into four quarters
1 ½ ea granny smith apples, peeled and diced to 1” (rough)
8-12 cups chicken stock
1 ½ cups heavy cream
12 sprigs fresh thyme, tied together tightly with string
2 tsp lemon juice
salt
white pepper

DIRECTIONS:
- In a medium sized soup pot, heat the olive oil. Add the onion, season well with salt, and sweat on medium heat until translucent (about 5 minutes). Do not brown the onion. Add the celery and cook for 3 more minutes.

- In a separate pot, bring the chicken stock to a boil and reduce heat to just a high simmer.

- Add the parsnips to the onions and stir well. Continue to cook for two minutes. Add enough hot chicken stock to cover the vegetables. Add the potato, apples, and thyme.

- Bring to a boil, reduce heat to a low boil, and cook uncovered until vegetables are very soft, about 50 minutes. You may need to add stock during the cooking time, but do so just that the vegetables are covered. Season lightly with salt and pepper.

- Add the cream and cook for 5 minutes. Remove the thyme. Puree the soup in batches in a blender. ALWAYS BE EXTREMELY CAREFUL WHEN PUREEING HOT LIQUIDS. Use the lid on the blender. When pureeing, fill the blender cup only 2/3 full, as the soup will be thick and you will need room to add more stock. If the soup is very thick in the blender, turn it off, add a little hot stock, cover and puree.

- Position a strainer over a clean soup pot and pour directly from the blender into the strainer. Push the soup through the strainer with a ladle.

- Place soup back over very low heat on the stove. Adjust consistency of the soup with chicken stock. Add the lemon juice and season finally to taste with salt and pepper. The soup is ready to serve, or can be chilled in an icebath and kept for up to 3 days.

- Serve soup in warm bowls. Drizzle lightly with lemon thyme oil, and sprinkle with thyme leaves.


Lemon-Thyme Oil
2/3 cup extra virgin olive oil
zest of half a lemon
12 sprigs fresh thyme
- Combine ingredients in a small saucepan. Heat to just hot to the touch (DO NOT BOIL), remove from heat and allow to steep for 1 hour. Strain and reserve oil. Allow to cool completely before serving.

Thursday, December 9, 2010

Green Tomato Pickles


I haven't eaten a pickled green tomato in at least 20 years. Growing up, I separated the delicatessens into two categories - ones that offered killer kosher pickles while you waited for your food, and ones that offered killer kosher pickles AND tomato pickles. Sadly, down here in TX, the only time I've seen a green tomato in a restaurant was a fried offering on a menu. (A confession: I thought Fried Green Tomatoes was something created for the movie.)
Last month our CSA delivered green tomatoes and I gave our share to a friend who was excited to fry them up. The following week more tomatoes came, and another friend wanted to make fried green tomatoes. (Another confession: I have actually tried fried green tomatoes and they are pretty tasty!) The CSA kept sending more green tomatoes each week, and I suddenly remembered I could make pickles out of them! That week I called dibs.
I went to my recipe I use for pickling daikon (one of Charlotte's absolute favorite things - "more pickled radish please!") which uses apple cider vinegar and a mix of pickling spices. But, after running out of vinegar and breaking a jar while processing the first batch, I went to the store to load up on plain old white vinegar and dill seed so I could follow Marisa's pickled tomato advice. Ironically, she published a post about breaking jars about 5 minutes after I had blown the bottom out of mine. Side note: I've never bought dill seed before but I *must* find something else to make with them - they smell fantastic! Side note #2: I don't actually know Marisa, but my sister does so I'm taking that license to use her first name in my post.
And, I can't believe I haven't eaten a green tomato pickle in 20 years. Yes, that is present tense. Because they guys were just jarred yesterday, so I've got to wait at least a week before breaking the seal. Just to tease me, the recorded show I chose to watch off the DVR this evening was an episode of The Best Thing I Ever Ate. And as I watched Michael Psilakis talk about his favorite garlicky sandwich from Katz's Deli, I paused the screen as he was about to take a bite and sure enough there were pickles AND pickled tomatoes sitting on his plate.

Green Tomato Pickles
Adapted from Food in Jars

Ingredients:
3 lbs green tomatoes
2 C white vinegar
2 C water
2 Tablespoon kosher salt
1 Tablespoon dill seed
10 whole garlic cloves

Equipment:
5 pint mason jars
canning supplies

1. Make brine of vinegar, water & salt. Heat to simmer and salt dissolves.
2. Wash green tomatoes and cut in wedges.
3. Sterilize jars and in each hot jar use clean hands to carefully place tomato wedges, two garlic cloves and 1/2 teaspoon dill seed. (Marisa added whole peppercorns and bay leaves - I intentionally omitted the bay, but complete forgot about peppercorn.)
4. Simmer lids, pour hot brine on top of tomatoes, apply warmed lids and screw on bands.
5. Process jars in boiling water for 10 minutes.
6. Remove and place on a dish towel or cooling rack. Let cool completely and ensure jars have sealed before storing in the pantry. If one doesn't seal, put it in the fridge instead.
7. Wait at least a week, or up to a year.

Thursday, June 24, 2010

Pesto Pasta with Tomatoes

This is, hands-down, the perfect quick summer meal. Spencer's been asking for pesto pasta for several days, and was all smiles last night upon discovering it had made on our dinner menu. I made an impulse purchase at the store and picked up a pint of the most beautiful assortment of adorable organic heirloom tomatoes. Do other people make impulse buys like this??
I do not have a green thumb. This is the second year in a row I purchased a few basic vegetables and herbs for our garden, and have very little to show for it. Last year we watched peppers form and grow, and then get eaten by birds and critters. We're watching a repeat performance this year as tomatoes change from green to orange to red, and then discover a big hole eaten into the backside. Very, very discouraging. But, luckily, there is one exception.
Basil. Ah basil. It seems that each year the basil plant is something that can't help but thrive. And, it (almost) makes up for the lack of productivity of the other plants. Because nothing more delicious, and easy, than freshly-made pesto. I am told that it freezes excellently, but I can't seem to keep from eating it all up during the summertime.
A couple tips about making pesto that I have learned from mistakes. Make sure you have LOTS of basil. Pesto is about basil flavor. I have screwed up in the past by adding too many nuts. It should be mostly basil, a bunch of cheese, a sprinkling of nuts, garlic to taste, and oil to your desired consistency. And, to prevent it from oxidizing and discoloring in the fridge if you're not using it all right away, float a small quantity of olive oil over the top.

Pesto Pasta with Tomatoes

1/2 lb pasta
1 pint small tomatoes, halved or quartered
1/2 - 3/4 Cup, or more, pesto
  - fresh basil
  - grated parmesan cheese
  - pine nuts
  - fresh garlic
  - olive oil
  - salt & pepper

  1. Put a large pot of salted water on the stove to boil for pasta, and cook according to directions. Reserve 1/2 Cup pasta water.
  2. Fill food processor with washed & dried basil leaves. Add a generous amount of cheese, some pine nuts, a few fresh garlic cloves, salt & pepper and some olive oil. Pulse a few times, then add additional olive oil as needed for desired consistency. If not using right away, leave it a bit on the thick side. Scoop pesto into a dish, smooth out the surface, and pour some olive oil evenly over the top.
  3. Toss hot pasta with pesto to coat, thinning with reserved pasta water if desired. Gently mix in tomatoes. Serve warm, at room temperature, or cold.

Thursday, June 17, 2010

Chocolate Zucchini Cake

First, an admission that I don't like zucchini. I'm friendly with most vegetables out there, but not the summer squashes. I recall the first time I had zucchini bread as a child. I wasn't told what it was beforehand, and found it to be delicious! I especially enjoyed the long strings of what I thought were pieces of shredded coconut scattered throughout. Upon finishing, I was told what was really in it, but honestly I didn't believe that to be the truth. I did not like zucchini, but I definitely enjoyed that dessert.
Now that our family has joined a CSA, we get local veggies delivered each week. And with the summer season upon us, that means the omnipresent zucchini have arrived. I politely decline my portion of the share for this vegetable week after week. But last time I decided to take a single (albeit giant) zucchini from among the plethora of cucurbits in our haul.
I thought I'd make zucchini bread, and quickly found what is by far & away the most highly rated recipe for zucchini bread on foodnetwork.com. But it has three cups of sugar (ack!) and two cups of zucchini. My single zucchini would yield far more than that, and I did not want any leftover. I mentioned this situation to my sister who wisely suggested "you should totally make the chocolate zucchini cake from The Baker's Cafe Cookbook." Most folks have had zucchini bread at some point, but how about a chocolate zucchini cake? Here's the kicker - it has less sugar (two cups) and more zucchini (three cups.) I'm guessing because of the chocolate it doesn't need to be so sweet? I dunno, I'm just making things up here. But what I do know is that it is awesome. And so are the rest of the recipes in this cookbook. I routinely make The Baker's Cafe's Oatmeal Cake for dessert when bringing a meal for friends who just had a baby. That recipe alone (conveniently located on the opposing page to the Chocolate Zucchini Cake) is totally worth the price of buying this cookbook.
 
So, when you see your local farmers markets teeming with fresh zucchini this summer, remember this cake. And that it freezes well too.

Chocolate Zucchini Cake
As printed in The Baker's Cafe Cookbook

4 eggs
2 Cups sugar
1 1/4 Cups (canola) oil
1 Tablespoon vanilla
2 1/2 Cups flour
1/3 Cup unsweetened cocoa (good quality, such as Droste)
1 teaspoon salt
2 teaspoons baking soda
3 Cups grated fresh zucchini (let drain for an hour, I have increased this quantity up to four cups, or whatever one shredded zucchini yields.)
1 Cup of chopped walnuts (or more if you like nuts)

Use mixer to combine eggs, sugar and oil. Blend in vanilla. In a separate bowl, sift together the dry ingredients. Add dry ingredients to the wet ingredients and blend. Fold in zucchini. Do not over mix. Stir in nuts.

Pour batter into a greased and floured bundt pan. Bake at 350 for 45-50 minutes, or until cake tester comes out clean (this was 60 minutes for me.)

Cool in pan for 20 minutes, then invert on a plate.

Frost cooled cake with Cream Cheese Frosting: (This makes a lot, I reduce the amounts by 1/4)

4 ounces cream cheese, softened
2 Tablespoons butter, softened
1 teaspoon vanilla
1 Cup + 2 Tablespoons confectioner's sugar, sifted

Use mixer to blend cream cheese and butter until smooth. Add vanilla and sugar and beat until very smooth. Drizzle over cooled cake. Optional: garnish with additional chopped walnuts.

Thursday, June 10, 2010

Summer Couscous Salad

In Houston, it's already been in excess of 90°F on a daily basis for a while now. Summer is here. Which means time for lots of visits with friends and relaxing by the pool. And eating. As someone who has trouble planning a weekly meals, or even a daily menu, I recognize that this approach of 'winging it' definitely doesn't cut it for entertaining larger numbers of people. Sure, the kids and I do just fine for a weeknight dinner pulled together from random assortment of staples from the fridge and pantry. So, summertime means I am forced to do some meal planning.
This couscous salad is one of my favorites. It's great as a light lunch for a small group, either by itself or on top of some salad greens. It a great salad to add to a buffet of summer salads. And, if bbq meats are on the menu, as is often the case during summertime, feel free to omit the chicken from this one. It's served cold, but still tastes fine at room temp. We're ready for the heat!

Summer Couscous Salad
Adapted from Sandra Lee, via Stephanie Kreml


1 1/4 Cup whole wheat couscous (bulk section of grocery store)
2 1/2 Cups chicken broth and/or water
1 12 oz jar marinated artichoke hearts, drain and reserve 1/4 Cup of liquid
1 1/2 Cup red cherry tomatoes
1 orange bell pepper
3 scallions, thinly sliced on a diagonal
1 (15-ounce) can chickpeas, drained and rinsed
1 large English cucumber, diced
2 cooked chicken breasts, diced (leftover rotisserie works great)
1 lemon, juiced
1/4 Cup extra-virgin olive oil
Salt and freshly ground black pepper

Directions:
Put broth and/or water on stove to boil. While waiting, begin to cut up vegetables and chicken and place in a large bowl. Add couscous to boiling liquid, remove from heat and cover for five minutes. Finish preparing remaining veggies. After 5 minutes, uncover couscous and fluff with a fork. Transfer the couscous to the large bowl with the veggies and chicken and toss gently.

Create dressing by whicking together reserved liquid from marinated artichoke, lemon juice, olive oil, salt and pepper. Pour over the couscous mixture and toss gently to distribute dressing.

Wednesday, April 7, 2010

Asparagus, Peas & Penne

Springtime! Asparagus season! The conclusion of Passover! All of these thoughts were swimming around my head yesterday as I tried to figure out a menu for dinner. "A big pasta feast" is what Spencer had announced, and we all agreed. I had purchased a few of pounds of asparagus a day earlier with no special plan in mind. Am I the only one out there who buys excessive amounts of produce on impulse?

And no-so-coincidentally, I received an email with link to a Martha Stewart photo slideshow with dozens of asparagus recipes. No disrespect to Julia Child, but forget about the Julie & Julia blog, I could spend the next months and a half making each of these recipes. Camembert & asparagus bread pudding, prosciutto-wrapped asparagus, asparagus soup... (note to self: don't forget to make asparagus soup this month!) And then I spied a recipe for asparagus, peas and radishes with fresh tarragon I had made from an issue of Every Day Food a few years back. If you have never tried this combination of flavors, it's unbelievable. (Yes, I know, you don't see any fresh tarragon in the photo above. Oops.)

But, pasta was clearly to be the plan for the night. Inspired by the asparagus and pea combination, as well as another asparagus and pasta recipe in the slideshow, a very simple idea formed for dinner. Yum, yum, yum.

And, a little-known fact. When we were (older) kids, our family drove 70 miles one way to visit a pick-your-own asparagus farm. Seriously.

Asparagus, Peas & Penne
Inspired by a few Martha Stewart asparagus recipes

8-10 oz penne, or another short pasta
2 lbs fresh asparagus
1/2 lb frozen green peas
1/4 C chopped fresh tarragon
2 Tablespoons olive oil
salt and pepper
1/4 C shredded or shaved parmesan cheese

Bring large pot of salted water to boil and add penne. Set timer 3 minutes shorter than recommended cook time on box. Meanwhile, wash asparagus, trim off ends and cut into 1 1/2" lengths. When timer sounds, add asparagus to boiling pot of pasta and boil for two additional minutes. Add the frozen peas, return to boil, and allow to finish cooking for one more minute.

Reserve 1/2 C of pasta water before draining everything together. Don't worry about getting all of the water out while draining. Transfer to a bowl and toss with tarragon, olive oil and salt & pepper. Add some reserved pasta water, or not. Serve with parmesan cheese.

Tuesday, April 6, 2010

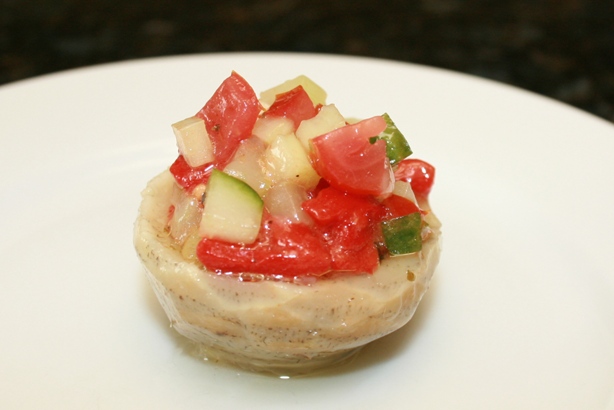
Artichoke Bottom Antipasti

I don't really know what to call this. It's not my creation. I have to give props to Dee. I can cook, but I need a plan. A while back Dee hosted a weeknight dinner in her home (only hours after new kitchen appliances were installed - brave!) for a dozen hockey wives and we were treated to quite a feast. Everything was awesome. I left there learning that white bean bruschetta is amazing, and it has since been added to my party appetizer rotation. I also learned that preparing a simple 'salad' served in artichoke bottoms makes it worthy of a food blog entry.

Though the ladies' night was last year, I have to confess that I hadn't gotten around to making these until recently because I was a bit taken aback by the price of the bottoms at my favorite grocery store. But, Spencer's Sunday school took a field trip to a grocery store I usually avoid, for excessively high prices, where I discovered a reasonably-priced (Safeway) store brand of marinated artichoke bottoms. I grabbed two jars - labeled artichoke crowns - and was already anticipating the treat to accompany our meal that evening.
Since so many months had passed, I pulled the 'salad' components from memory. It can definitely be tinkered with depending on personal preference. The trick for presentation and mouth appeal is to cut everything in a very fine dice, about 1/8" cubes. This isn't really finger food (though our 2 1/2 year old has other opinions as she cups it with both hands) so I'd recommend serving as antipasti for a sit down meal, not for stand up appetizer.

Artichoke Bottom Antipasti
Inspired by Dee Paradine

1 12 oz jar marinated artichoke bottoms (approx. 8)
1/4 C finely diced celery hearts
1/4 C finely diced English (seedless) cucumber
1/4 C finely diced roasted red pepper
1/4 C finely diced tomato
A few tablespoons Italian salad dressing, or oil & vinegar
Salt & pepper

Dice all veggies and toss together in a bowl with salad dressing, or oil and vinegar, and season with salt and pepper to taste. If you are making this in advance, put salad in a small container in the fridge until ready. To serve, arrange artichoke bottoms on a serving plate and fill with salad.

Thursday, January 21, 2010

Baby Artichokes and Farfalle


I must say, humbly, I think this dish might be one of the best things I've ever created. Seriously. I was inspired at the grocery store seeing these adorable baby artichokes and knew I just had to buy them. Aren't these the cutest baby vegetables you've ever seen?

But, then, what to make with them? A simple preparation was called for, something that wouldn't overshadow the flavor. I have to confess, I LOVE artichokes. I eat them simply steamed on a regular basis, with melted lemon-butter to dip in. Mmmm. And the kids have learned to love them too. And while I've been happy to share a whole artichoke, I think their enjoyment is about to push us to the point of needing to buy a second one for the kids to share so I can get my own back! Truthfully, except for recently discovering how amazing they taste in soup, the only think I've ever done is to steam them whole. But, presented with these adorable babies, which don't even require removing the choke, I needed to come up with a new plan.

Cooking in basics like olive oil, shallots and white wine. Matching with similarly sized pasta, and finishing with parsley and fresh tomatoes. It was amazing to discover how mind-blowingly good this tasted! The only major bummer is that after falling in love with this, it was many months before I saw them reappear in the store.


Baby Artichokes and Farfalle

1 - 1 1/2 lbs baby artichokes
1 lemon
1 large shallot or 1 small onion
olive oil
1/2 Cup white wine
1/4 lb sliced or roughly chopped tomatoes (I like campari)
1/4 C chopped parsley
8 oz (1/2 box) farfalle pasta (or substitute another short pasta)

1. Put large pot of salted water on to boil for pasta and cook according to directions.

2. Squeeze juice from lemon into a large bowl of water. Prepare baby artichokes by trimming outer leaves, base and cutting into quarters (or sixths or eighths, depending on size.) It is not necessary to clear out the choke. Drop trimmed artichokes into lemon water.

2. Heat olive oil in skillet over medium high heat. Sautee shallots and (drained) artichokes until tender 5-7 minutes. Add white white and simmer to allow it reduce.

3. Drain cooked pasta, top with sauteed shallots and artichokes. Add chopped tomatoes, parsley, salt & pepper and mix together.

Thursday, December 3, 2009

Artichoke & Jerusalem Artichoke Soup


I really like soup. And it's actually cold here (30s!) which is all the inspiration needed to start making soup this week. A few days ago I made some beef vegetable barley soup. Yesterday I made a pot of this soup, and as I type, I'm having leftovers for breakfast. Soup for breakfast is the perfect way to start a chilly day! (Well, maybe not the beef vegetable barley first thing in the morning.)

I've made this soup several times before using only regular (globe) artichokes. But, I noticed that my favorite grocery store sells Jerusalem artichokes too, and I was so excited to make it with both! Actually, I had never purchased (or even eaten) Jerusalem artichokes, so I was anxious to see how it would be different that what I had made in the past.

Plus, it's always fun to use an immersion blender. Though, some words of advice when making this at home. Artichokes are very fibrous. Even after then are trimmed and sautéed and simmered. You will likely need to pause and clean the blades a few times when blending the soup.

And, even after it looks nice & smooth, it needs to be run through some kind of strainer or chinois to remove the rest of the fibers because having any of those remain in your finished soup is not good. Trust me. It's not a fun process, but the results are well worth it. Note: Do not use the inside of a salad spinner as shown above. This was not nearly fine enough and too many shreds of fibrous material made their way into the finished soup.

Artichoke & Jerusalem Artichoke Soup
Adapted from Gourmet

1 lb Jerusalem artichokes (sunchokes)
2 globe artichokes (or use 3-4 if not using Jerusalem artichokes)
1 lemon
1 onion
olive oil
2 Tablespoons butter
1/2 Cup white wine
2 1/2 Cups chicken broth

1. Prepare vegetables:
  • Jerusalem artichokes by peeling and cutting into large (1/2") dice/slices
  • Prepare globe artichokes by snapping back outer leaves until they break. Cut off the rest of the leaves, within 1" of the base. Peel the stem and trim off the end. Quarter the artichoke and remove the fuzzy choke with a grapefruit spoon. Split the section again to make eighths. Drop the cleaned & trimmed pieces into a large bowl of water with juice from one lemon squeezed in to prevent browning.
  • Dice one onion
2. Melt butter and olive oil in the bottom of a soup pot. Drain globe artichokes, and add them along with onion and Jerusalem artichokes to the pan. Sautee for 8-10 minutes until onions are translucent and veggies are crisp-tender. Add white wine and simmer until most of the liquid has evaporated. Add chicken broth, bring to boil then cover and reduce heat to low and simmer for 30 minutes.

3. Turn off heat and allow soup to cool in the pot for 15 minutes or so. Use an immersion blender to puree the mix. Clean the blade frequently as it may become clogged with fibers. The soup can also be pureed in batches in a blender or food processor. Strain the pureed soup through a strainer or chinois. This will be a real workout on the arms pressing it through. Make sure to scrape down the goodness will adhere to the back of the strainer.

4. You can make this a cream soup by finishing with up to 1/2 Cup of heavy cream, but it's not required. And I'm not really sure it needs any garnish either, but am open to suggestions!

Monday, November 23, 2009

Roasted Kohlrabi with Cauliflower and Brussel Sprouts


Does this even count as a 'dish' worthy of a blog entry? It's just roasted vegetables. Though, I confess, roasted veggies was something I only discovered within the last decade or so. I thought all vegetables like this could only be prepared by steaming. Which IS the only way I ever ate them growing up. Fast-forward to adult life and somewhere I stumbled upon roasting them instead. Ah ha! Asparagus tastes even more awesome. Cauliflower transforms from good to fantastic. Brussel sprouts - wow!

But, it was still German week when I was trying to figure out a vegetable side dish so I added kohlrabi into the equation for this meal. I'd never eaten kohlrabi (aka German turnip) before, but with our membership in a CSA this year I had plenty of chances to experiment with turnips. My sister laughed and educated me that "what to do with all those turnips?" was the proverbial question asked by all CSA members at some point.

This preparation is extremely straightforward. The only words of advice I can add when making this are "do not absent-mindedly leave the house with vegetables in the oven that have already been roasting for 1 1/4 hours." If you make this same error, you too will end up with an extremely 'carmelized' side dish. The bread crumb topping was partially inspired by this recipe, and partially to cover up the extremely dark color.


Roasted Kohlrabi with Cauliflower and Brussel Sprouts
Inspired by Nicolé, Adapted from Food Network

3 medium kohlrabi
1 lb brussel sprouts
1 small head cauliflower
olive oil
salt & pepper
1 slice whole wheat bread

Heat oven to 400. Peel kohlrabi and dice into 3/4" pieces. Trim brussel sprouts by cutting off root end and removing outer layer of leaves. Cut in half, or quarter if extremely large. Trim cauliflower into bite-sized florets. Toss veggies with olive oil, salt & pepper and distribute in a single layer on a sheet pan. Bake for 1 1/4 hours.

While veggies are baking, put bread into food process to make crumbs. Spread on a baking sheet and toast in oven for 3-4 minutes until gold brown.

Wednesday, October 28, 2009

Butternut Squash Soup


Last week we had a brief tease of fall weather. I miss not having that season here in Houston. During these momentary cool temperatures I was inspired to make a 'classic autumn' recipe. Ironically, butternut squash soup was not something we ever ate growing up in NY, but it seemed like the right place to turn, and I bought a beautiful 2 1/2 pound squash on impulse at the grocery store.

After flipping around for recipe inspiration, I concluded that there aren't really radical differences. So, I closed the computer and made up my own by drawing on whatever information had remained in my brain. The ones that recommended roasting squash first definitely sounded tastier, so I started with that. And peeling a whole squash was something I'd never done so I thought it was be good to mark that off my culinary checklist. I would have simply roasted the halves, which some recipes recommended, and I'm sure would be just fine.

The amount of other veggies are simply based on what was on hand. I mean, seriously, does anyone ever measure out "1/2 Cup diced onion?" I never do. Just cut it up and throw it all in. Unless, it seems to be in gross excess, then I'll still chop up the whole onion and put half in the fridge for something else. Though, I must confess, this approach of 'use what you have' ended up bitting me in the rear. I had half of a (4 C) container of chicken broth in the fridge which I discovered was not enough for a proper vegetable:liquid ratio to yield what one would call a 'soup.' It was more like a vegetable puree. It still tasted amazing, even if it the consistency reminded me of something I spooned into Charlotte's mouth as a baby.


Butternut Squash Soup
Adapted from an assortment of recipes

1 butternut squash (2 lbs)
1 onion, diced
1 carrot, diced
1 rib of celery, diced
1/2 teaspoon rubbed sage (or 1 Tablespoon fresh sage)
4 C chicken broth
salt & pepper
olive oil

1. Heat oven to 400. Peel squash and cut into 1" cubes. Toss with olive oil and roast for 30-40 minutes, until carmelized.

2. Sautee onion, carrot and celery in a pot on the stove over medium heat until softened, 8-10 minutes. Add roasted squash, sage, salt & pepper and stir. Add 3 C chicken broth and simmer for 30 minutes.

3. Use immersion blender to puree until smooth. Adding additional 1C chicken broth as needed to yield desired consistency.

Tuesday, October 6, 2009

French Green Bean Salad

Seriously, this title would mean absolutely nothing to me if I stumbled across it in a recipe list. Laughably, I found a recipe with a (very) similar title on a site which shall remain nameless that had two ingredients: green beans and salt. And the directions said to briefly simmer the green beans in salted boiling water. That's it. Hmmm.

My inspiration for making this dish came from some truly awesome-looking green beans at the market. Awesome enough to entice me put back the asparagus from my basket (that was on sale!) and the fact that Jim is still in Paris. After making Poule au Pot and Potatoes Lyonnaise on Sunday, I wanted to add something new to the table when serving leftovers for dinner on Monday.

I kept this somewhat simple so the green beans were the star, and included a few of my favorite ingredients commonly found in a green bean salad. For me, this meant shallots soaked in red wine vinegar for an hour or so beforehand to help mellow the bite (a technique I learned from my sister,) chopped walnuts (didn't get around to toasting them, which would have been preferable,) and some amazing artisanal hand-made herb chevre I found at the grocery story, called "Femme Fatale" from Austin-based Cheesy Girl. Who would have guessed that the shallots turned out to be the start ingredient? I must say, even though yelling at the table is generally not a good thing, it made me smile inside to hear not quite two-year old Charlotte demanding more "Shallots! Shallots!"

French Green Bean Salad
Adapted from a lot of similar recipes

1 pound green beans, or haricot verts if you want to play up the French theme
2 large shallots, sliced extremely thin
2 oz of your favorite chevre, crumbled
1/4 C roughly chopped walnuts, toasted
red wine vinegar
olive oil
salt & pepper

Mix thinly sliced shallots with enough vinegar to cover, 2-3 tablespoons, and set aside. Wash green bean and trim ends. Steam (or boil) until crisp-tender, then plunge into ice water bath to stop cooking and set the bright color. Dry beans (salad spinner or towel) and toss with shallots, vinegar & oil (to taste) and plenty of salt & pepper. Top with toasted nuts and crumbled chevre.